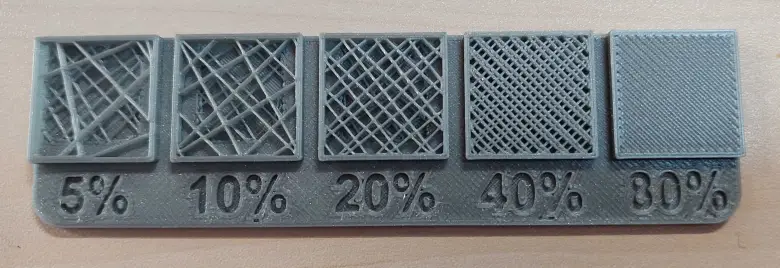
What is infill density %?
Your infill density % is the level of filament that is put inside your object to prevent it from breaking. The more infill the stronger object, but also a larger filament use, increased weight, and longer print time.

How can I decide if my object needs a higher or lower infill density level?
If you can break your object with your bare hands, then you could benefit from increasing the infill level. A 5% increase will make your object much stronger than before so our approach usually is to start with 15% and then increase with 5% until it is right.
If you would like to have a lighter object or an object that is more flexible you can try to decrease the infill%. Again our usual approach is to start at the recommended 15% and then decrease with 5% until we are satisfied with the print.
There is no benefit in having a stronger object if you can’t break it, then all extra filament will just make your object heavier, and consume more filament. Therefore our ground philosophy is that you shall aim to print with the minimum infill % that still provides you with a satisfying print.
What other parameters does changing the infill density affect?
Changing the infill desity% is closely linked to the thickness of the layers around your model, also called shell thickness. If your shell is strong you usually need less infill, and that can save you some cost and time.
What will happen if I set my infill density level to 100%
You will get a very strong object, but you will also have increased the weight, filament usage, and printing time. It is fun to experiment with different infill density %, but 100% is usually only used to print mechanical parts.
What will happen if I set my infill density level to 0%
You will have an object that relies only on the outer layers (The shell). This can be beneficial, if you would like to make a prototype, and don’t want to use much time and filament in the testing process.
